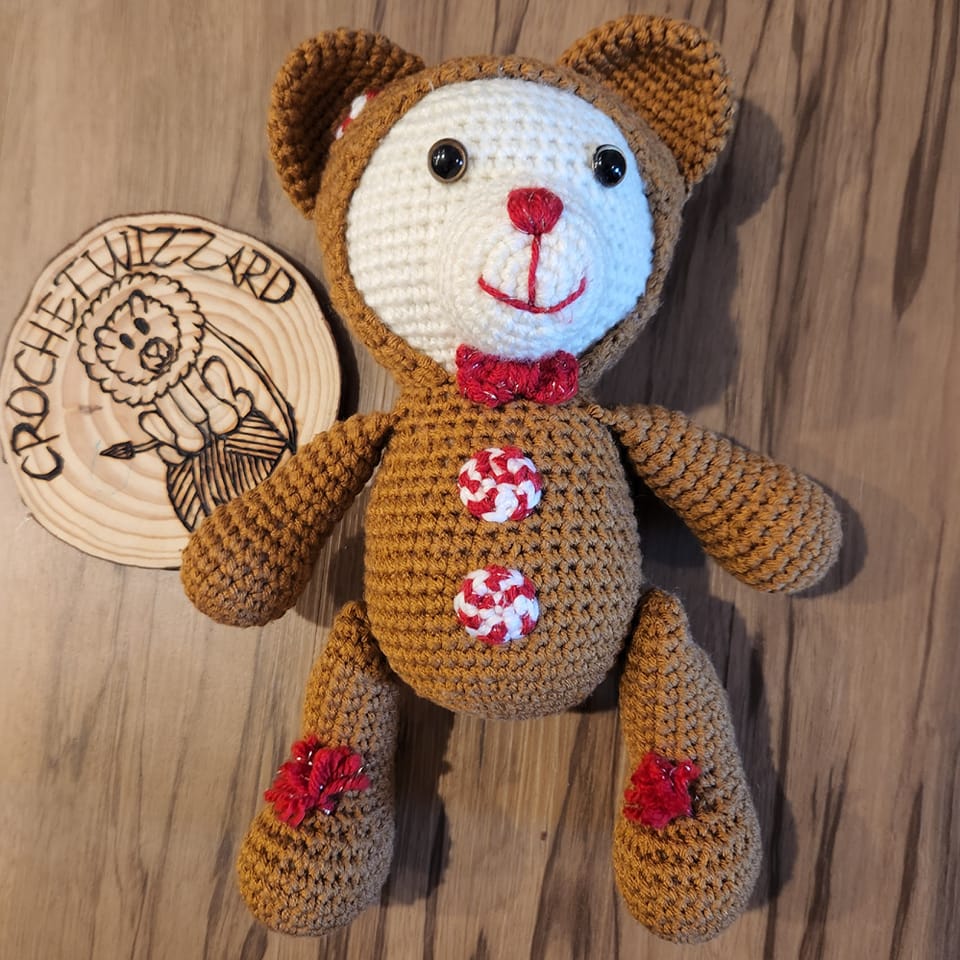
This lovely little gingerbread bear is based on one of my favorite Christmas decorations growing up! I had to make my own. I love him so much! I hope you do too!


Do not sell, reproduce, or change the pattern itself in any way! You are welcome to sell your completed products, just make sure to refer to me as the designer! Please make sure to tag me
@crochetwizzard#crochetwizzard!
Materials –
- Worsted weight yarn
- Brown, cream, red, white
- Hook size 3.5mm (E)
- 12mm Safety Eyes or an alternative form of eyes
- Stitch Marker
- PolyFill
- Tapestry Needle
- Scissors
- Sewing Pins
US Terminology-
Abbreviations-
- Rd (s) – Rounds
- MR – Magic Ring
- St(s) – Stitch(s)
- Sc – Single Crochet
- Dc – Double Crochet
- Inc – Increase
- Dec – Invisible Decrease
- In front loops only pick up the next two loops, yarn over, and pull through twice.
- FO – Fasten Off
- BLO- Back Loop Only
- FLO – Front Loop Only
Notes-
- Magic Ring Alternative- chain 2 and single crochet in the second chain from the hook.
- This will be crocheted in the round.
- If not specified or in () repeat to the end of the round.
- Stuff as you go.
–Arms (make 2)-
There are more pictures in the downloadable PDF version purchasable here!
Brown
Rd 1: sc 6 in MR
Rd 2: inc (12)
Rd 3: sc, inc (18)
Rds 4-8: sc around (18) (5 rounds)
Rd 9: sc, dec (12)
Rds 10-18: sc around (12) (9 rounds). Stuff hand well and the arm loosely.
Rd 19: fold in half and sc through both sides. Sc 6 times.
FO, you’ll weave in the end when you attach the arms.
Body-
Brown
Rd 1: sc 6 in MR
Rd 2: inc (12)
Rd 3: sc, inc (18)
Rd 4: sc 2, inc (24)
Rd 5: sc 3, inc (30)
Rd 6: sc 4, inc (36)
Rd 7: sc 5, inc (42)
Rd 8: sc 6, inc (48)
Rds 9-14: sc around (48) (6 rounds)
Rd 15: sc 6, dec (42)
Rds 16-17: sc around (42) (2 rounds)
Rd 18: sc 5, dec (36)
Rds 19-20: sc around (36) (2 rounds)
Rd 21: sc 4, dec (30)
Rd 22: sc 3, this is where you will add the 1st arm. Insert your hook through the 1st st of the arm and body (sc 6). Sc 9 (weaving your ends in as you sc), this is where you will add the 2nd arm. Insert your hook through the 1st st of the arm and body (sc 6), (as you continue to crochet, weave in your ends), sc 6 (30)
There are more pictures in the downloadable PDF version purchasable here!
Rd 23: sc around (30)
Rd 24: sc 3, dec (24). Stuff
Change to Cream
There are more pictures in the downloadable PDF version purchasable here!
Rd 25: BLO sc around (24)
Rd 26: sc 3, inc. (30)
Rd 27: sc 4, inc (36)
Rd 28: sc 5, inc (42)
Rd 29: sc 6, inc (48)
Rd 30: sc 7, inc (54)
Rds 31-40: sc around (54) (10 rounds)
Rd 41: sc 7, dec (48)
Rd 42: sc 6, dec (42)
Rd 43: sc 5, dec (36)
Rd 44: sc 4, dec (30)
Rd 45: sc 3, dec (24)
Rd 46: sc 2, dec (18)
Rd 47: sc, dec (12)
Rd 48: dec (6)
Do not stuff the head until after the hood has been crocheted!
FO, leaving a tail for sewing. (Once you have made the hood, you can stuff the head. When you do so pull out (frog) a few sts, stuff, redo the sts, and sew closed.)
Hood –
There are more pictures in the downloadable PDF version purchasable here!
Brown
Start by finding the front st of the right arm (lefties – left arm), and go toward the front 2 sts. You will insert your hook into the FLO down so the wrong side will be facing out, going outward. There will be 4 sts between the 2 edges of the hood.
Row 1: attach to the FLO of rd 25, (sc 3, inc) x5, ch1, and turn (25)
Row 2: dec, sc, (inc, sc4) x4, inc, sc, ch 1 and turn (29)
Row 3: dec, sc4, (inc, sc5) x3, inc, sc4, ch 1 and turn (32)
Row 4: dec, sc 5, (inc, sc 6) x3, inc, sc 3, ch 1 and turn (35)
Row 5: dec, sc 6, (inc, sc 7) x3, inc, dec, ch 1 and turn (37)
Row 6: dec, sc 7, (inc, sc 8) x2, inc, sc6, inc, dec, ch 1 and turn (39)
Row 7: dec, (sc 8, inc) x3, sc7, inc, dec (41)
Rows 8-10: sc across, ch 1 and turn (41) (3 rows)
Row 11: inc, sc 39, inc, ch 1 and turn (43)
Row 12: inc, sc 41, inc, ch 1 and turn (45)
Row 13: inc, sc 43, inc, ch 1 and turn (47)
Row 14: inc, sc 45, inc, ch 1 and turn (49)
Row 15: ch 11, sc on the other side to close the gap. Sc 48. Sc 11 across the ch (60)
Rd 16: sc around (60)
Rd 17: sc 8, dec (54)
Rd 18: sc 7, dec (48)
Rd 19: sc 6, dec (42)
Rd 20: sc 5, dec (36)
Rd 21: sc 4, dec (30)
Rd 22: sc 3, dec (24)
Rd 23: sc 2, dec (18)
Rd 24: sc, dec (12)
Rd 25: dec (6)
FO, leaving a tail for sewing. Now stuff the head with the hood down. Insert the eyes between rds 37 and 38, centered in the hood gap, about 8 sts apart.
Ears (make 2 sets in both colors)-
Brown and cream
Rd 1: sc 6 in MR
Rd 2: inc (12)
Rd 3: sc, inc (18)
Rd 4: sc 2, inc (24)
Rds 5-8: sc around (24) (4 rounds)
Rd 9: fold in half and sc through both sides. Sc 12 times.
FO, leaving a tail for sewing. Attach cream on cream and brown on brown attaching on either side up top starting 2 rds out,
Foot- (make 2)
There are more pictures in the downloadable PDF version purchasable here!
Brown
Ch 6
Rd 1: sc in the second ch from the hook, sc3, 4 sc in the last ch, and continue working around the ch, sc 3, 3 sc in the first st you sc in (14]
Rd 2: inc, sc 3, inc x4, sc 3, inc x3 (22)
Rd 3: sc, inc, sc 3, inc, sc, inc, sc 2, inc, sc, inc, sc 3, inc, sc, inc, sc 2, inc (30)
Rds 4-7, sc, around (30) (4 rounds)
Rd 8: sc 4, (dec, sc) x3, (sc, dec) x3, sc 8 (24)
Rd 9 : sc 4, dec 6, sc 8 (18)
Rd 10: sc 4, dec 3, sc 8 (15)
Rds 11-19: sc around (15) (9 rounds) Stuff foot firmly and leg loosely.
Rd 20: sc 3, dec (12)
Rd 21: dec (6)
FO leaving a long tail for sewing. Insert your yarn through your now closed top of the leg, and out the side between rds 17 and 18, centered on the side. Pick a different side for each leg so that the yarn can be on the outside and the toes are facing forward when on either side of the body, Place the legs on either side with the yarn on the outside with the toes facing forward. Insert the yarn between rds 9 and 10, snagging a st, and go back through the leg. Repeat this a few times in the same st and then an up and down direction to create a T (verticle and horizontal) proceeding the same way, and once finished weave in the ends. You will know you did it correctly if the legs can rotate,
Add a small poof of a tassel to each foot with red.
Muzzle-
There are more pictures in the downloadable PDF version purchasable here!
Cream
Rd 1: sc 6 in MR
Rd 2: inc (12)
Rd 3: sc, inc (18)
Rd 4: sc 2, inc (24)
Rds 5-8: sc around (24) (4 rounds)
FO, leaving a tail for sewing. Attach with the bottom above the 4th cream rd up and the top below the 13th cream rd. Stuff as you sew.
For the nose: The top starts between rds 5 and 6, 2 sts across centered, down to 1 st. You will go in and out of those 3 holes over and over until the yarn is able to bulge on either side of the nose. Once that is done, put a stripe of yarn across the top of the nose, coming up through the hole at the bottom of the nose and then go down to the other side of the noses center hole. Send the yarn across going out on either side of rd 3 tacking down at the bottom of the earlier line.
Peppermints- (make 3)
There are more pictures in the downloadable PDF version purchasable here!
White and Red
Each of these will be made by switching back and forth between white first and then red with 1 st of each color for both rds.
Rd 1: sc 6 in MR
Rd 2: inc (12)
FO both colors, leaving a tail for sewing with both colors. Attach 2 centered on the belly, and the 3rd in front of the left ear.
Bow-
Red
Ch 5
Row 1: dc in 3rd ch from the hook, dc 2, ch2, and turn (3)
Row 2: dc 3, ch 2, and turn (3)
Row 3: dc 3 (3)
FO, leaving a tail to wrap around the bow and for sewing.
Weave the end through the bow to row 2, wrap the end around row 2, and attach to the top of the brown rds of the body, centered.
Tail-
There are more pictures in the downloadable PDF version purchasable here!
Brown
Rd 1: sc 6 in MR
Rd 2: inc (12)
Rds 3-5: sc around (12) (3 rounds)
Rd 6: dec (6)
FO, leaving a tail for sewing. Attach centered on the back between rds 10 and 11. Insert the needle from side to side and up and down to secure firmly.
I would love to see your pictures! Please tag me in your pictures,
@crochetwizzard #crochetwizzard #gingerthegingerbreadbear #gingerbreadbear #crochetbear #crochetgingerbreadbear!
If you have any questions, please feel free to contact me! You can direct message me on Facebook or Instagram at @crochetwizzard or email me at crochetwizzardd@gmail.com.