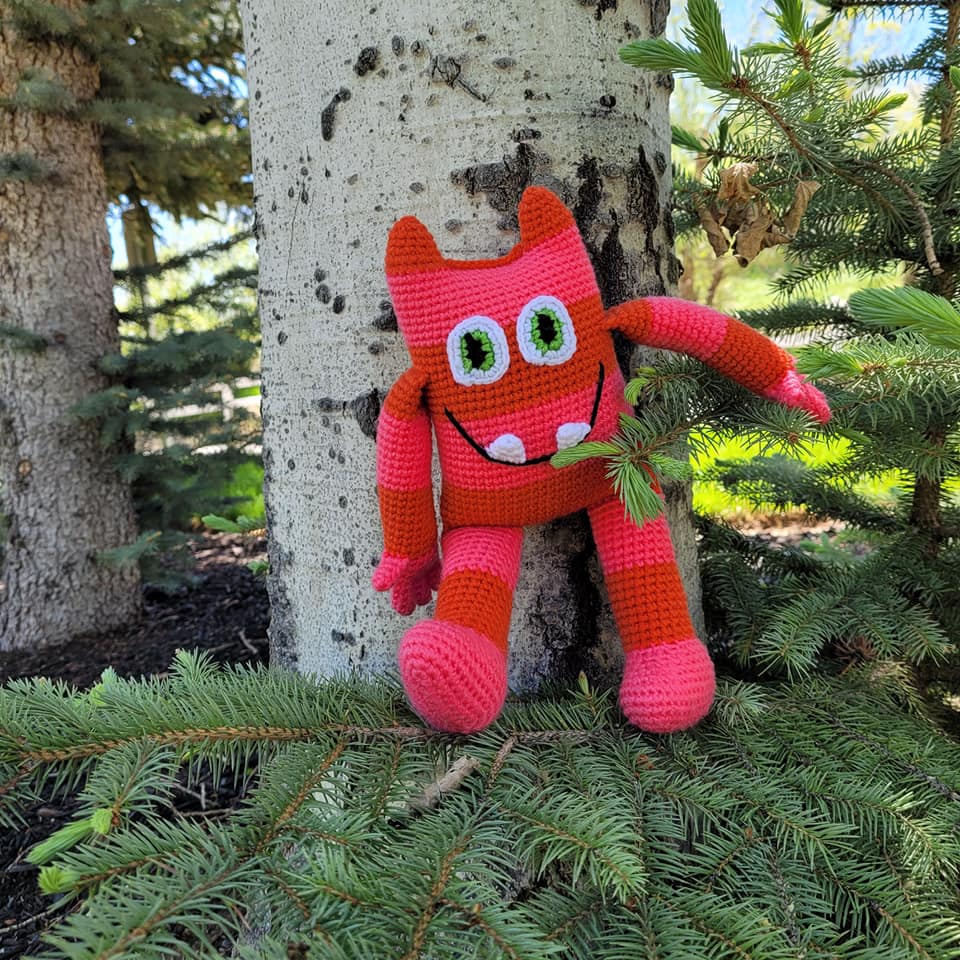


This little cutie was inspired by my little boy! He is going through a monster obsession phase! I made Wibbles the Book Monster and now here is a monster to help with your worries!


Do not sell, reproduce, or change the pattern itself in any way! You are welcome to sell your completed products, just make sure to refer to me as the designer! Please make sure to tag me
@crochetwizzard #crochetwizzard!
Materials-
- Worsted weight yarn
- Pink, orange, white, green and black
- Hook size 3.5mm (E)
- Stitch Marker
- PolyFill
- Tapestry Needle
- Scissors
- Sewing Pins
US Abbreviations-
- Rd(s)- Round(s)
- MR- Magic Ring
- St(s)- Stitch(es)
- Ch- Chain
- Sc- Single Crochet
- Inc- Increase
- Dec- Invisible Decrease
- In front loops only pick up the next two loops, yarn over, and pull through twice.
- FO- Fasten Off
- FLO- Front Loop Only- for closing up holes.
Notes-
- Magic Ring Alternative- chain 2 and single crochet in the second chain from the hook.
- This will be crocheted in the round.
- If not specified or in () repeat to the end of the round.
- Stuff as you go.
Arms (make 2)-
Thumbs (make 2)
Pink
Rd 1: sc 6 in MR
Rds 2-4: sc around (6) (3 rounds)
Rd 5: fold in half and sc through both sides. Sc x3 (3)
FO
In the downloadable PDF version there are more pictures purchase here
Fingers (make 2 sets of 3, 6 in total)-
Pink
Rd 1: sc 6 in MR
Rds 2-5: sc around (6) (4 rounds)
FO except for the third finger of each set. Continue the arm of the first set or after making the 4 fingers that are FO.
Rd 6: sc and place the st marker. Sc 2 on the second finger, sc 6 around the third finger, sc 3 on the second finger, sc 6 around the first finger (18)
Rds 7-9: sc around (18) (3 rounds)
Change to orange
Rd 10: sc 5, this is where you will be attaching the thumb. Insert your hook through the st of the thumb, then through the next st of the arm and finish with sc x3, sc 10 (weaving your ends in as you sc)
Congratulations you just attached your thumb, without sewing the thumb on! Haha!
Rds 11-18: sc around (18) (8 rounds)
Change to pink
Rds 19-27: sc around (18) (9 rounds)
Change to orange
Rds 28-31: sc around (18) (4 rounds)
Rd 32: fold in half and sc through both sides. sc x9 (9)
FO and repeat for the second arm with the second set of fingers. This is where you will make the last finger, so it still has the working yarn connected to continue the 2nd arm.
Feet- (make 2)
Pink
Ch 9
Rd 1: sc in the second ch from the hook, 6 sc, 4 sc in the last ch, and continue working around the ch, sc 6, 3 sc in the last st (20)
Rd 2: inc, sc 6, inc x4, sc 6, inc x3 (28)
Rd 3: sc, inc, sc 6, inc, sc, inc, sc 2, inc, sc, inc, sc 6, inc, sc, inc, sc 2, inc (36)
Rds 4-6: sc around (36) (3 rounds)
Rd 7: sc 9, (sc, dec) x4, sc 15 (32)
Rd 8: sc 9, dec x4, sc 15 (28)
Rd 9: sc 8, dec x3, sc 14 (25)
Rd 10: sc 6, dec, sc 2, dec, sc 13 (23)
Rd 11: sc 4, dec, sc, dec, sc, dec, sc 11 (20)
Change to orange
Rds12-20: sc around (20) (9 rounds)
Change to pink
Rds 21-29: sc around (20) (9 rounds)
FO the first foot, but not the second foot.
Change to orange
Rd 30: Ch 9, sc on the second leg and place the st marker. Sc around the leg. Sc 9 across one side of the ch, sc around the first leg, sc 9 across the other side of the ch (58)
Rds 31-38: sc around (58) (8 rounds)
Change to pink
Rds 39-47: sc around (58) (9 rounds)
Change to orange
Rds 48-52: sc around (58) (5 rounds)
Rd 53: sc 9, this is where you will be placing the first arm, insert your hook through the st of the arm and then through the next st of the body, finish the foot with sc x9, sc 20 (weaving your ends in as you sc), this is where you will be placing the second arm, insert your hook through the st of the arm and then through the next st of the body. Finish with sc x9, sc 11 (weaving your ends in as you sc) (58)
Congratulations you just attached your arms without sewing on the arms! Haha!
Rds 54-56: sc around (58) (3 rounds)
Change to pink
Rds 57-65: sc around (58) (9 rounds)
FO, and you will weave in the ends as you sc to close up the head.
There are more pictures in the downloadable PDF version purchasable here!
Horns (make 2)-
Orange
Rd 1: You will be making circles of 18 sts on either side of the head. To start the rd, fold the circle in half and count 9 sts in. This will be your rd starting point, sc 18.
Rd 2: sc around (18)
Rd 3: sc, dec (12)
Rd 4-5: sc around (12) (2 rounds)
Rd 6: dec (6)
FO and sew in the ends before you make the second horn, make sure you have stuffed the body. It’s easier that way.
To close the head, sc through both sides of the remaining 11 sts between the horns. Sew in the ends.
If you would like to make the legs to be able to bend, then, at the top of the last pink stripe of the legs sew a crease to help the legs bend.
Eyes (make 2)-
Black
You will be changing colors mid rd, so, you’ll want to make sure you use a st marker to mark where the rd starts and ends.
Ch 4
Rd 1: sc in the second ch from the hook. Sc 2, change to green and put 3 sc (in the same st) in the last black st, continue working around the ch, sc, 3 sc (10)
Rd 2: inc, sc, inc, change to white, inc 3, sc, inc 3 (18)
Rd 3: sc, inc, sc, inc, sc (25)
FO, leaving a tail for sewing. Sew at the bottom starting above rd 51 and the top ending below rd 59. Sew in the ends.
Teeth (make at least 2, you can make more)-
White
Rd 1: sc 5 in MR
Rd 2: sc around (5)
Rd 3: sc, inc, sc, inc, sc (7)
FO, leaving a tail for sewing. Sew on the mouth. This is where you can have fun with how you would like to make your mouth look. I sewed it below rd 50 and above rd 41.
There are more pictures in the downloadable PDF version purchasable here!
I would love to see your pictures! Please tag me in your pictures,
@crochetwizzard #crochetwizzard #wallytheworrymonster #crochetmonster!
If you have any questions, please feel free to contact me! You can direct message me on Facebook or Instagram at @crochetwizzard or email me at crochetwizzardd@gmail.com.