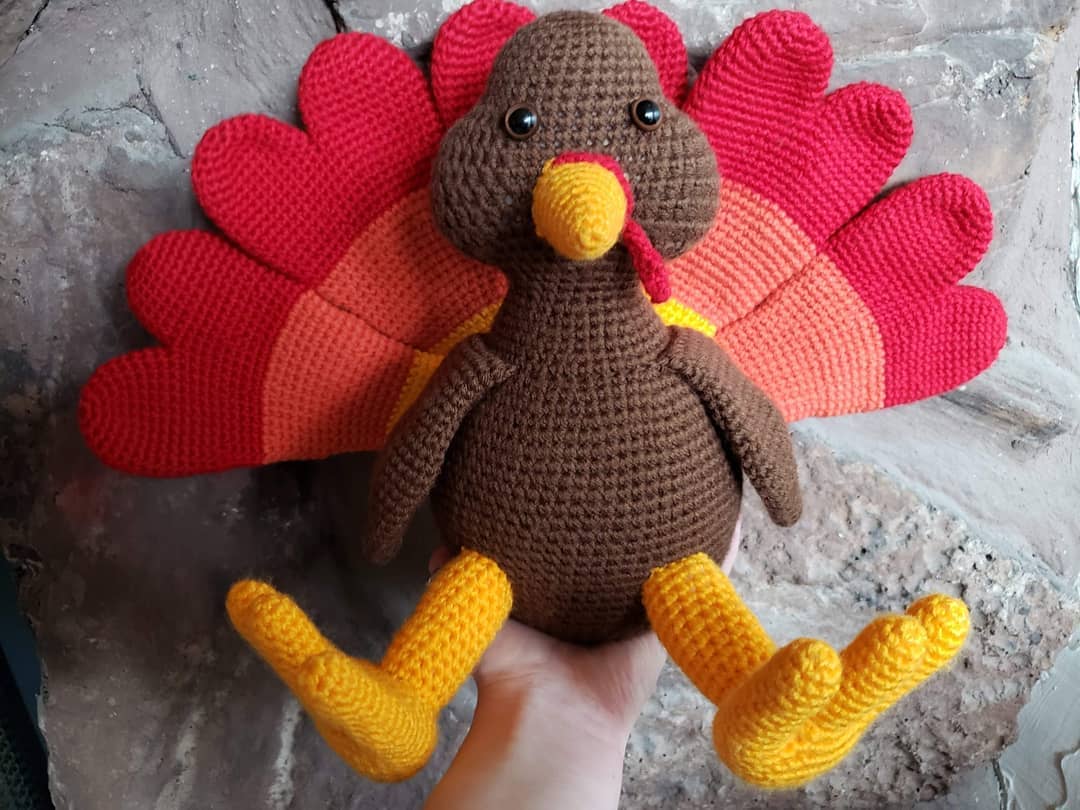


I’ve been wanting to design a turkey for a while! This guy actually turned out a lot bigger than planned, but he sure is a handsome fellow! He makes for an amazing centerpiece!


Do not sell, reproduce, or change the pattern itself in any way! You are welcome to sell your completed products, just make sure to refer to me as the designer! Please make sure to tag me
@crochetwizzard #crochetwizzard!
Materials-
- Worsted weight yarn
- Brown, red, orange, and Yellow
- Hook size 3.5mm (E)
- 12mm Safety Eyes, or an alternative form of eyes
- Stitch Marker
- PolyFill
- Poly Pellets
- Old sock or pantyhose
- Tapestry Needle
- Scissors
- Sewing Pins
US Abbreviations-
- Rd(s)- Round(s)
- MR- Magic Ring
- Sc- Single Crochet
- Hdc- Half Double Crochet
- Hdc dec- Half Double Crochet Decrease. Yarn over and pull through 2 sts, yarn over and pull through all the loops.
- St(s)- Stitch(s)
- Inc- Increase
- Dec- Invisible Decrease
- In front loops only, pick up the next two loops, yarn over, and pull through twice.
- FO- Fasten Off
- FLO- Front Loop Only
Notes-
- Magic Ring Alternative- chain 2 and single crochet in the second chain from the hook
- This will be crocheted in the round.
- If not specified or in () repeat to the end of the round.
- Stuff as you go.
Head-
Brown
Rd 1: sc 6 in MR
Rd 2: inc (12)
Rd 3: sc, inc (18)
Rd 4: sc 2, inc (24)
Rd 5: sc 3, inc (30)
Rds 6-11: sc around (30) (6 rounds)
Rd 12: sc 2, (hdc inc) x5, sc 10, (hdc inc) x5, sc 8 (40)
Rd 13: sc 2, (hdc, hdc inc) x5, sc 10, (hdc, hdc inc) x5, sc 8 (50)
Rds14-18: sc 2, hdc 15, sc 10, hdc 15, sc 8 (50) (5 rounds)
Rd 19: sc 2, (hdc, hdc dec) x5, sc 10, (hdc, hdc dec) x5, sc 8 (40)
Rd 20: sc 2, (hdc dec) x5, sc 10, (hdc dec) x5, sc 8 (30)
Rd 21: sc around (30) Insert the eyes between rds 12 and 13 about 7 sts apart.
Rd 22: sc 3, dec (24)
Rds 23-24: sc around (24) (2 rounds) Stuff
Rd 25: sc 3, inc (30)
Rd 26: sc around (30)
Rd 27: sc 4, inc (36)
Rd 28: sc around (36)
Rd 29: sc 5, inc (42)
Rd 30: sc around (42)
Rd 31: FLO sc 6, inc (48)
Rd 32: sc 7, inc (54)
Rd 33: sc 8, inc (60)
Rd 34: sc 9, inc (66)
Rd 35: sc 10, inc (72)
Rds 36-50: sc around (72) (15 rounds)
Rd 51: sc 10, dec (66)
Rd 52: sc around (66)
Rd 53: sc 9, dec (60)
Rd 54: sc around (60)
Rd 55: sc 8, dec (54) Stuff
Rd 56: sc around (54)
Rd 57: sc 7, dec (48)
Rd 58: sc around (48)
Rd 59: BLO sc 6, dec (42)
Rd 60: sc 5, dec (36)
Rd 61: sc 4, dec (30) Stuff part of the way. Put about a cup and a half or more as deemed necessary of poly pellets in an old sock or pantyhose and insert it into the body. This will help to ground him. If needed, add some more stuffing around the pellets.
Rd 62: sc 3, dec (24)
Rd 63: sc 2, dec (18)
Rd 64: sc, dec (12)
Rd 65: dec (6)
FO and close through the FLO and sew in the ends.
Beak-
Yellow
Rd 1: sc 5 in MR
Rds 2-3: sc around (5) (2 rounds)
Rd 4: inc, sc 4 (6)
Rd 5: sc 2, inc (8)
Rds 6-7: sc around (8) (2 rounds)
Rd 8: sc 4, inc, sc 3 (9)
Rd 9: sc around (9)
Rd 10: sc 2, inc (12)
Rd 11: sc around (12)
Rd 12: sc 3, inc (15). Stuff as you are sewing to the head.
FO and sew to the face at the top between rds 14 and 15 and at the bottom between rds 19 and 20. Sew in the ends.
Gobble-
Red
There are more pictures in the downloadable PDF version purchasable here!
Insert your hook into the top of the beak starting on the left side of the beak and going across to the right. Continue down the side of the beak. Crochet 8 chs across the beak inserting your hook into the beak, YO. The chs will be attached to the beak. These next chs will not be attached to the beak. Ch 8, sc 3 in the second ch from the hook, sc 2, sl st in the next 4 chs.
FO and sew in the end.
Feet (make 2)
Yellow
Make 3 toes
Rd 1: sc 6 in MR
Rd 2: sc, inc (9)
Rds 3-12: sc around (9) (10 rounds)
FO for the first two toes, on the third toe, you will continue to the rest of the foot and the toe you just made, is the first toe referred to in rd 13.
Rd 13: line up the toes and sc 5 on the second toe, sc 9 around the third, sc 4 on the second, sc 9 around the first (27)
Rds 14-16: sc around (27) (3 rounds)
Rd 17: sc, (dec, sc 2) x6, dec (20)
Rd 18: sc around (20)
Rd 19: sc 6, dec, sc 8, dec, sc 2 (18)
Rd 20: sc, dec (12) Stuff
Rd 21: dec (6)
FO leaving a tail for sewing to the leg.
Leg (make 2)
Ch 15
Rd 1: sc in each of the chs to create a ring. Starting in the fifteenth ch from the hook, join the chain to the first chain, creating a ring. (15) (make sure there is no twist in the ch)
Rds 2-11: sc around (15) (10 rounds) stuff as you sew the leg to the body.
FO and sew to the top of the feet with the yarn tail from the foot, lining up with the back of the foot.
Sew to the body at the top between rds 45 and 46 and the bottom between rds 51 and 52, sew in the ends.
Wings (make 2)
Brown
Rd 1: sc 6 in MR
Rd 2: sc, 2 inc (10)
Rd 3: sc, inc (15)
Rd 4: sc around (15)
Rd 5: sc 2, inc (20)
Rd 6: sc around (20)
Rd 7: sc 3, inc (25)
Rd 8: sc around (25)
Rd 9: sc 4, inc (30)
Rd 10: sc around (30)
Rd 11: sc 5, inc (35)
Rds12-14: sc around (35) (3 rounds)
Rd 15: sc 5, dec (30)
Rd 16: sc 4, dec (25)
Rds 17-18: sc around (25) (2 rounds)
Rd 19: sc 3, dec (20)
Rds 20-24: sc around (20) (5 rounds)
FO leaving a tail for sewing. Attach the wings between rds 30 and 31, where the neck ends and the body begins. Sew in the ends.
Feathers (make 5)
You will be making 5 feathers, starting with 2 red feathers that will be connected. You will change colors 2 times. Next, you will make a yellow circle, sew the feathers to the circle, ending with sewing this to the bottom of the turkey.
Red
Make 2-
Rd 1: sc 6 in MR
Rd 2: inc (12)
Rd 3: sc, inc (18)
Rd 4: sc 2, inc (24)
Rds 5-9: sc around (24) (5 rounds)
With the first feather FO, with the second feather, prepare to connect the two feathers together.
Line up the two feathers
Rd 10: sc in the first feather, place your st marker and sc around. Sc on the second feather next to the last st on the second feather and around. (48)
Rds 11-14: sc around (48) (4 rounds)
Rd 15: sc 4, dec (42)
Rds16-18: sc around (42) (3 rounds)
Change to orange
Rds 19-21: sc around (42) (3 rounds)
Rd 22: sc 3, dec (36)
Rds 23-28: sc around (36) (6 rounds)
Rd 29: sc 2, dec (30)
Rds 30-31: sc around (30) (2 rounds)
Change to yellow
Rds 32-45: sc around (30) (14 rounds)
FO leaving a long tail for sewing about 12 inches long.
Lay the feathers out like a fan with the yellow ends together and overlapping slightly with the upper edges of the feathers touching each other.
There are more pictures in the downloadable PDF version purchasable here!
There will be an arch at the bottom of the feathers. You will make a yellow circle to cover up this arch. Take the long yarn tails to sew the feather ends together. Go back and forth a couple of times to make sure that they are securely sewn together.
Take a long piece of red yarn to sew the edges of the feathers together. You will take your needle and insert it into both edges of the first 2 feathers at the bottom of the red feathers. Tie a knot to connect the 2 feathers. Insert the needle into the feather and go across to the other side of the feather. Repeat until you have all the feathers attached in an arch or fan shape. Repeat the process where the yellow and orange meet. This should keep the feathers together well.
Circle for the Feathers-
Yellow
Rd 1: sc 6 in MR
Rd 2: inc (12)
Rd 3: sc, inc (18)
Rd 4: sc 2, inc (24)
Rd 5: sc 3, inc (30)
Rd 6: sc 4, inc (36)
Rd 7: sc 5, inc (42)
Rd 8: sc 6, inc (48)
Rd 9: sc 7, inc (54)
Rd 10: sc 8, inc (60)
FO leaving a long tail for attaching to the feathers and to the turkey.
Fold the circle in half, put it around the bottom of the feathers and sew it to the feathers. This helps to have a cleaner look at the bottom of the feathers. Now sew around the half-circle to the bottom of the turkey. Start at the center by aligning it with the center of the turkey and sew around the half-circle to the turkey.
Take a red piece of yarn to attach to the center feather under where the two bumps attach and then insert it into the back center of the head. Leave about an inch of space of loose yarn between the feathers and the head, back to the feathers and tie. This will help to keep the feathers up and in place.
I would love to see your pictures! Please tag me in your pictures,
@crochetwizzard #crochetwizzard #geraldtheturkey #crochetturkey!
If you have any questions, please feel free to contact me! You can direct message me on Facebook or Instagram at @crochetwizzard or email me at crochetwizzardd@gmail.com.