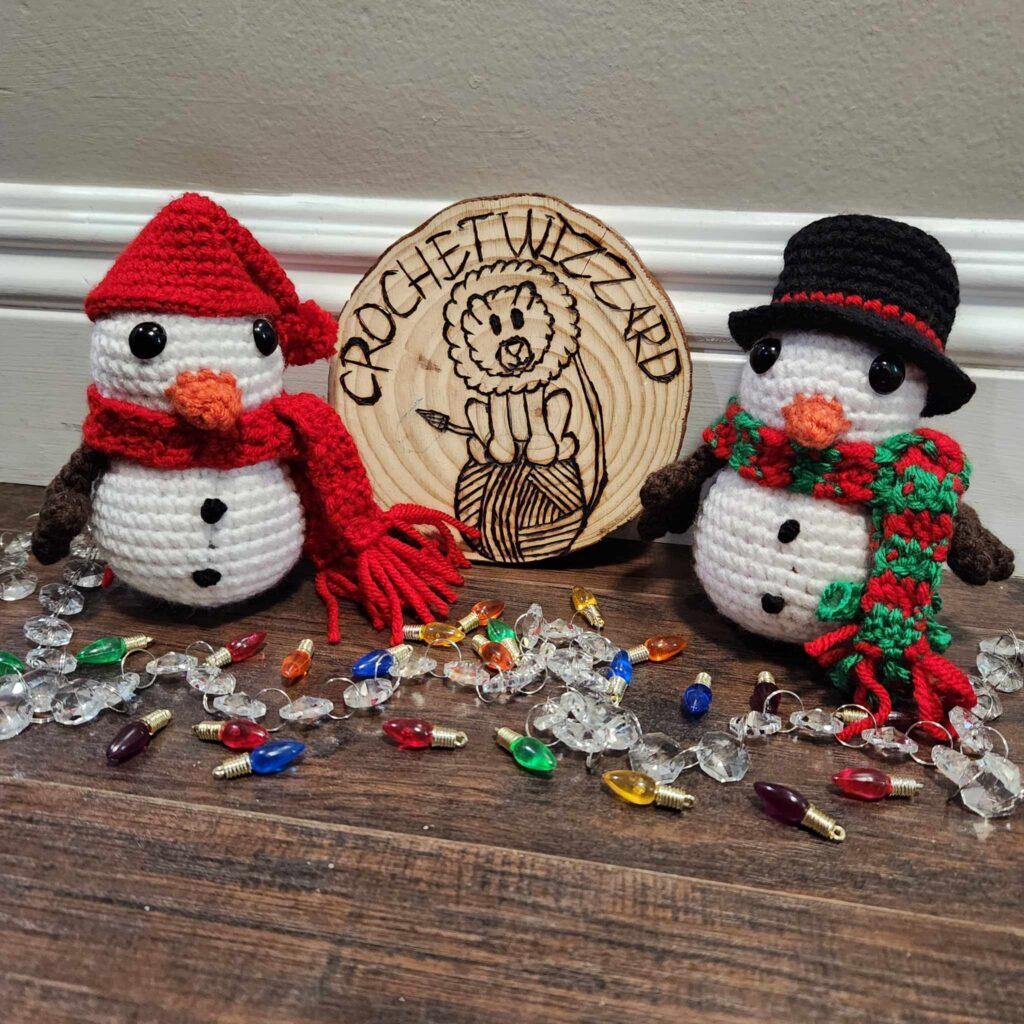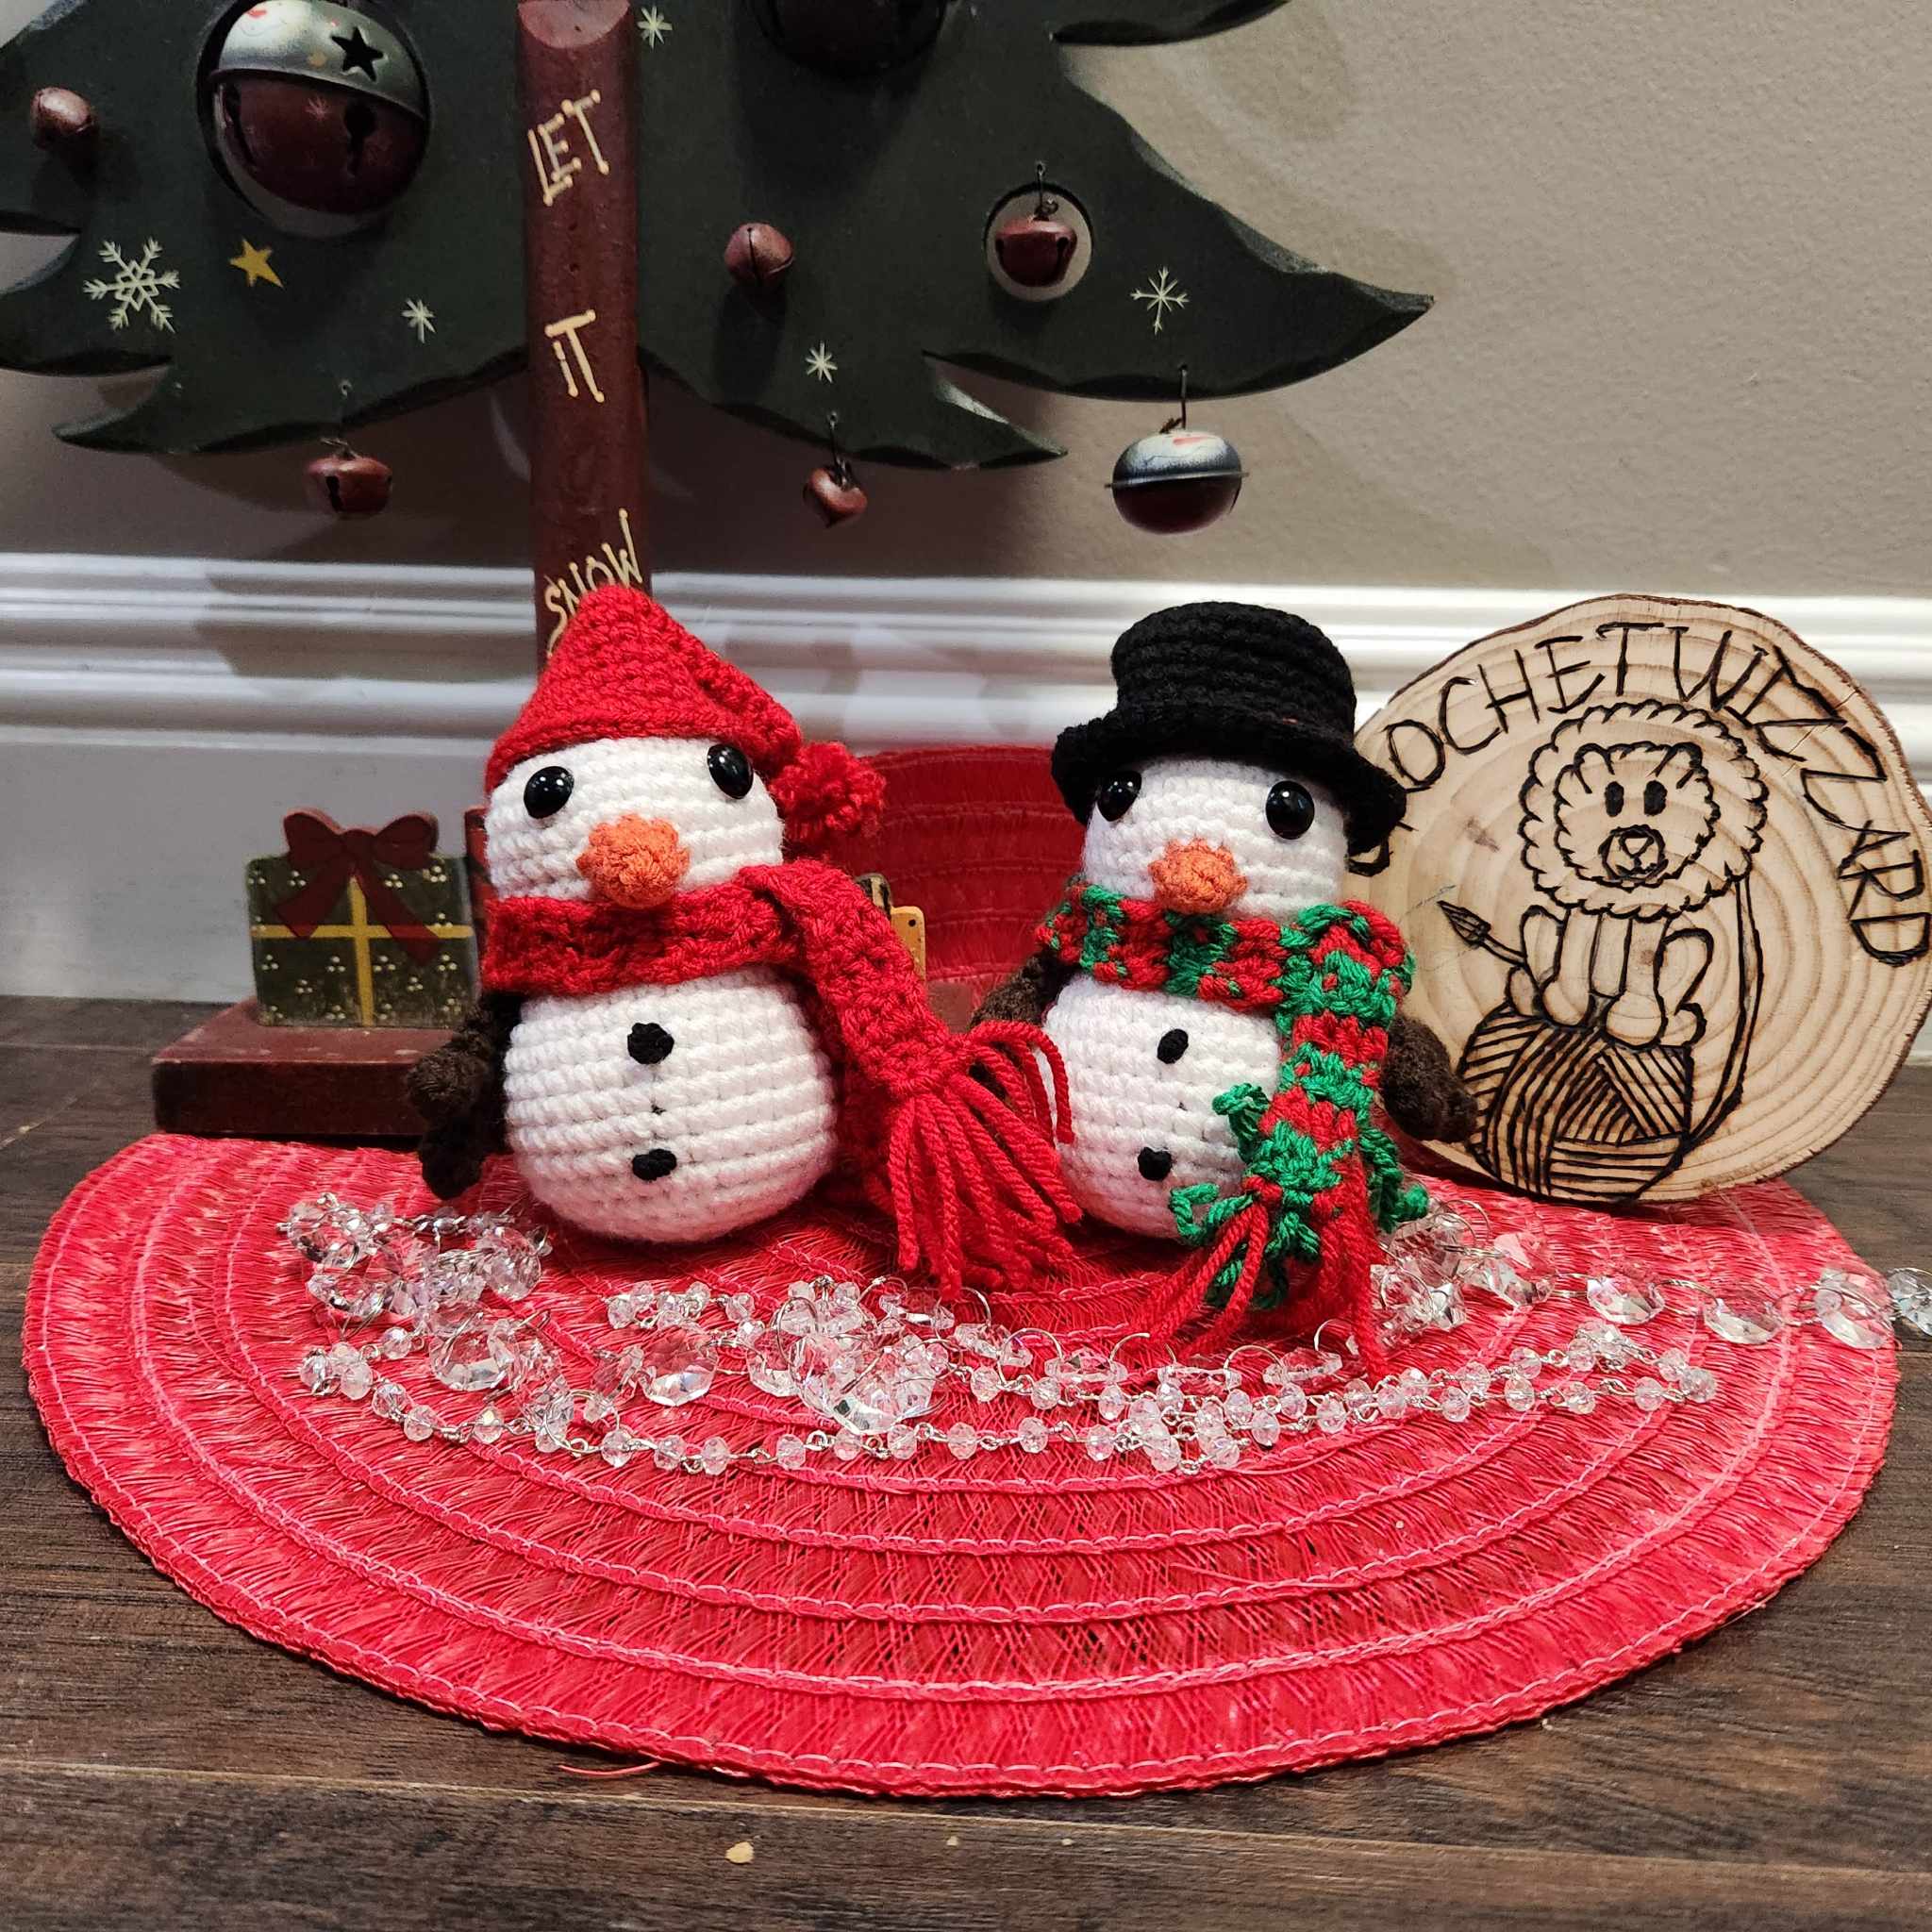
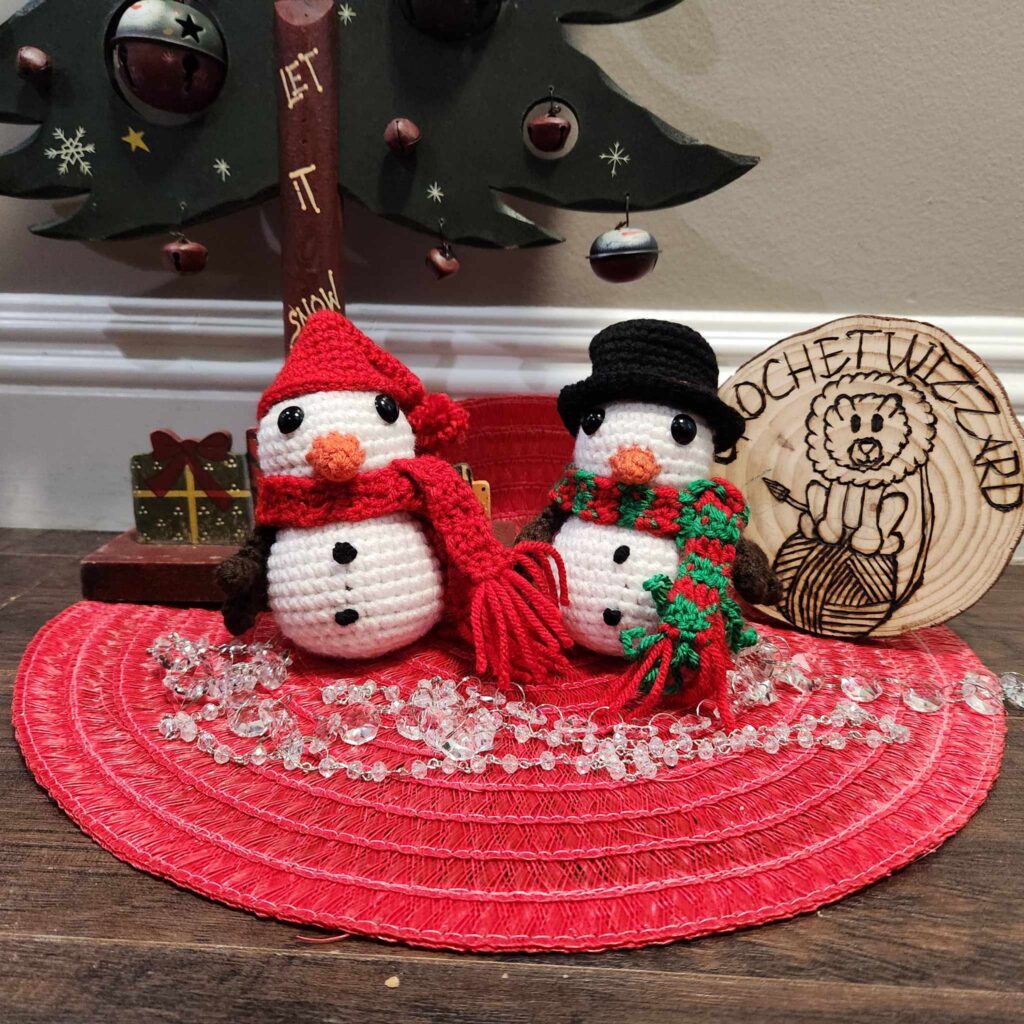
This little cutie is such a fun little snowman and loves to enjoy walks on the beach with his new holiday friends! He wishes to enjoy his time sunbathing at the beach, but he doesn’t have his own little flurry, but he is a no sew pattern so there’s that!
This is such a fun pattern! I enjoyed working with my testers on this crochet Snowman pattern and I’m sure that you will enjoy working on this adorable snowman amigurumi! One of the best parts of this pattern is that you don’t have to sew on the arms or the nose! No sew patterns are so nice! I love them so much! Especially when they are so cute like Joy!
This is a quick pattern to work up and is perfect for a gift or an item for your holiday booths! You can use Worsted Weight yarn or larger and they will be just as cute! If you use a larger-sized yarn she will be larger and you can charge more for less work done! Yahoo!! I mean who isn’t looking for patterns that are quick, easy, and fun to make for your booths! You won’t want to miss out on this sweet crochet snowman then!


Do not sell, reproduce or change the pattern itself in any way! You are welcome to sell your completed products, just make sure to refer to me as the designer! Please make sure to tag me.
@crochetwizzard #crochetwizzard
Materials
- Worsted weight yarn
- white, brown, red, black, orange, and green
- Hook size 3.5mm (E)
- 12mm Safety Eyes, or an alternative form of eyes
- Stitch Marker
- Polyfill
- Tapestry Needle
- Scissors
- Sewing Pins
US Terminology –
Abbreviations –
- Rd(s) – Round(s)
- MR – Magic Ring
- St(s) – Stitch(s)
- Sk – Skip
- Sst – Same Stitch
- The sts in the () are done in the same st
- Spst – Separate Stitches
- The sts in the () are done in separate sts
- Sc – Single Crochet
- Dc – Double Crochet
- Inc – Increase
- Dec – Invisible Decrease
- In front loops only, pick up the next two loops, yarn over, and pull through 2 loops.
- FO – Fasten Off
- BLO – Back Loop Only
- FLO – Front Loop Only – for closing up holes.
Notes –
- Magic Ring Alternative – chain 2 and single crochet in the second chain from the hook.
- This will be crocheted in the round.
- If not specified or in () repeat to the end of the round.
- Stuff as you go.
- With all no sew patterns edit where the pieces are, by adding them a st earlier or later if your tension is different than mine.
Finger (make 4) –
Brown
Rd 1: sc 5 in MR
Rd 2-3: sc around (5) (2 rounds) You don’t need to stuff.
Rd 4: fold in half and sc through both, doing sc 2 spst.
FO, leaving a small tail.
Arms (make 2) –
Brown
There are more pictures in the downloadable PDF version purchasable here!
Rd 1: sc 6 in MR
Rd 2-5: sc around (6) (4 rounds)
Rd 6: sc, this is where you will add the 1st finger, insert your hook through the 1st st of the finger and the next available st on the arm doing (sc 2)spst, sc (weaving your ends in as you sc), this is where you will add the 2nd finger, insert your hook through the 1st st of the finger and the next available st on the arm doing (sc 2)spst (as you continue to crochet weave in ends) (6)
Rd 7-10: sc around (6) You don’t need to stuff.
Row 11: fold in half and sc through both, doing sc 3 spst.
FO, leaving a small tail.
Snowman –
White
Rd 1: sc 6 in MR
Rd 2: inc (12)
Rd 3: sc, inc (18)
Rd 4: sc 2, inc (24)
Rd 5: sc 3, inc (30)
Rd 6-8: sc around (30) (3 rounds)
Rd 9: sc 14, ch 3, sk 3, sc 13 (30)
Rd 10: sc around (30)
Rd 11: sc 3, dec (24)
Rd 12: sc 2, dec (18)
Rd 13: sc, inc, sc 2, this is where you will add the 1st arm, insert your hook through the 1st st of the arm and the next available st on the body doing (inc, sc 2)spst, (in, sc 2)spst x2 (weaving your ends in as you sc), this is where you will add the 2nd arm, insert your hook through the 1st st of the arm and the next available st on the body doing (inc, sc 2)spst (as you continue to crochet weave in ends), inc, sc (24)
Rd 14: sc 3, inc (30)
Rd 15: sc 4, inc (36)
Pause here and work on the Nose.
Nose –
Orange
There are more pictures in the downloadable PDF version purchasable here!
Rd 1: attach the yarn to the first sk st of Rd 9 and sc 3, sc on the side of the st on Rd 9, sc 3 along the bottom side of the ch, sc on the side of the st of Rd 9 (8)
Rd 2: sc around (8)
Rd 3: sc 3, dec (6)
FO, and close the hole, and weave in ends.
Continue on with the snowman and insert eyes between rds 6 and 7, about 7 sts apart.
Body Continued –
Rd 16-22: sc around (36) (7 rounds)
Rd 23: sc 4, dec (30)
Rd 24: sc 3, dec (24)
Rd 25: sc 2, dec (18)
Rd 26: sc, dec (12) Stuff
Rd 27: dec (6)
FO and weave in ends.
Buttons (make 2) –
There are more pictures in the downloadable PDF version purchasable here!
Make a French Knot in Black – poke yarn through the belly, wrap yarn around the needle about 8 times, and poke the yarn back in the belly in the same spot.
Floppy Hat –
Color of Choice
The pattern for this is in the downloadable PDF version purchasable here!
Top Hat –
Black
There are more pictures in the downloadable PDF version purchasable here!
Rd 1: sc 6 in MR
Rd 2: inc (12)
Rd 3: sc, inc (18)
Rd 4: sc 2, inc (24)
Rd 5: sc 3, inc (30)
Rd 6: BLO sc around (30)
Rd 7-10: sc around (30) (4 rounds)
Change to red
Rd 11: sc around (30)
Change to Black
Rd 12: FLO sc 4, inc (36)
Rd 13: sc 5, inc (42)
Rd 14: sc 6, inc (48)
FO, weaving in the ends.
Scarf –
Red
For this, you can either do all 1 color or change the color every Row.
There are more pictures in the downloadable PDF version purchasable here!
Ch 5
Row 1: dc in 3rd ch from hook, dc 2, ch 2 and turn
Row 2-29: dc 3, ch 2 and turn
Row 30: dc 3
You can add more Rows if you would like your scarf longer
FO, and add little tassels to both ends.
There are more pictures in the downloadable PDF version purchasable here!
I would love to see your pictures! Please tag me in your pictures,
@crochetwizzard #crochetwizzard #crochetsnowman #joymcflurrytonthesnowman!
If you have any questions, please feel free to contact me! You can direct message me on Facebook or Instagram @crochetwizzard or email me at amidesigns@crochetwizzard