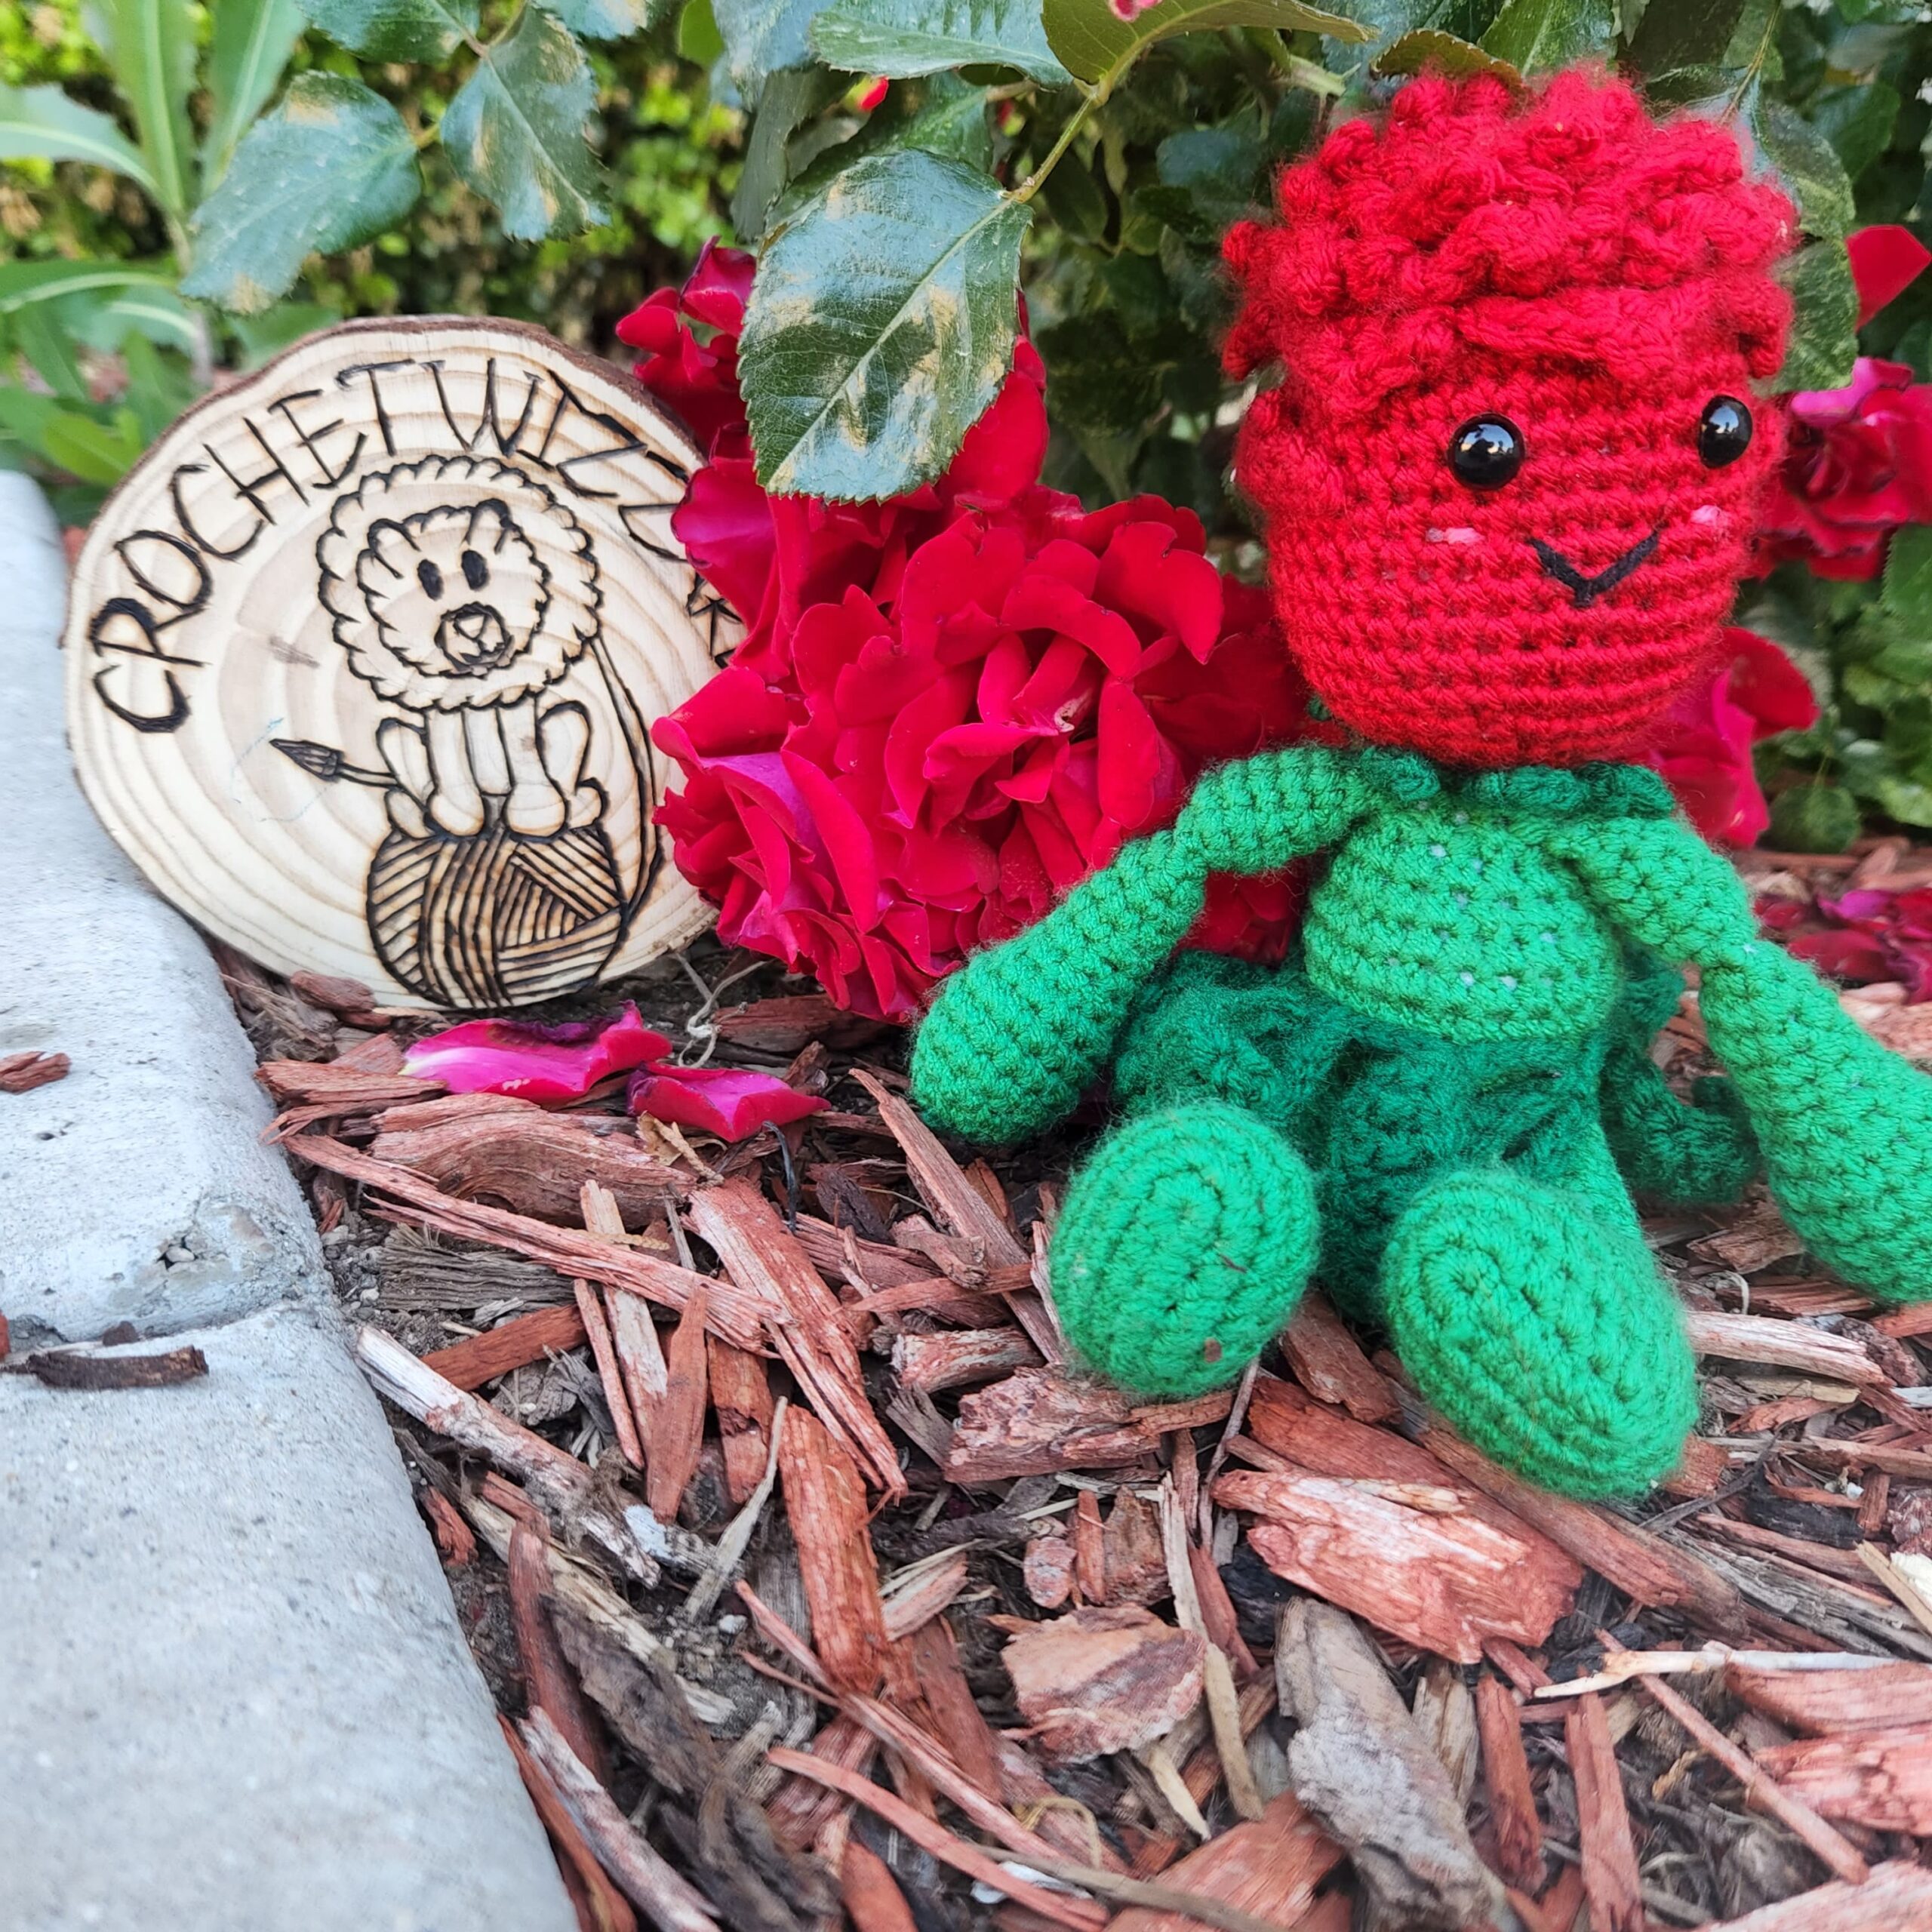

This little cutie is one flower that is always a classic and is part of my Garden BUDdies series. A flower for all the seasons. I love roses and had to have this be for Fall.


Do not sell, reproduce, or change the pattern itself in any way! You are welcome to sell your completed products, just make sure to refer to me as the designer! Please make sure to tag me
@crochetwizzard#crochetwizzard!
Materials –
- Worsted weight yarn
- Light and dark green, red, black, and pink
- Hook size 3.5 mm (E)
- 10 mm Safety Eyes, or an alternative form of eyes
- Stitch Marker
- PolyFill
- Tapestry Needle
- Scissors
- Sewing Pins
US Terminology
Abbreviations –
- Rd(s) – Round(s)
- MR – Magic Ring
- St(s) – Stitch(s)
- Sl St – Slip Stitch
- Ch – Chain
- Sc – Single Crochet
- Hdc – Half Double Crochet
- Dc – Double Crochet
- Tc – Triple Crochet
- Inc – Increase
- Dc Inc – Double Crochet Increase
- Dec – Invisible Decrease
- In front loops only, pick up the next 2 loops, yarn over, and pull through 2 loops.
- YO – Yarn Over
- Fhdc – Foundation Half Double Crochet
- Ch 2 (for this pattern you will only ch 1), *YO, insert hook into the 2nd ch from the hook (into the chain), YO, pull through ch, YO, pull through 1 loop to create the ch, YO, and pull through all 3 loops, repeat from * for the desired number of fhdc, but insert hook into the ch created before.
- Adjust the st for fdc and ftc
- P – Picot
- Ch 3, sl st in the 3rd ch from the hook.
- FO- Fasten Off
- BLO – Back Loop Only
- FLO – Front Loop Only – for closing up holes.
Notes –
- Magic Ring Alternative – chain 2 and single crochet in the 2nd chain from the hook.
- This will be crocheted in the round.
- If not specified or in () repeat to the end of the round.
- Stuff as you go.
Rose Head –
There are more pictures in the downloadable PDF version purchasable here!
Red
Rd 2 -7 are in the BLO
Rd 1: sc 6 in MR
Rd 2: inc (12)
Rd 3: sc, inc (18)
Rd 4: sc 2, inc (24)
Rd 5: sc 3, inc (30)
Rd 6: sc 4, inc (36)
Rd 7: sc around (36)
In both loops here on out unless specified.
Rds 8 – 11: sc around (36) (4 rounds)
Rd 12: In BLO sc 16, in both sc 13, in BLO sc 7 (36)
Rds 13 – 17: sc around (36) (5 rounds). Insert your eyes between rds 10 and 11, 6 sts apart.
Rd 18: sc 4, dec (30)
Rd 19: sc 3, dec (24)
Rd 20: sc 2, dec (18)
Rd 21: sc, dec (12) Stuff
Rd 22: dec (6)
FO, leaving a tail to sew the bottom closed. Add a mouth and cheeks.
The Petals are at the top. I am going to list the number of times to repeat rather than rds, starting in the FLO of the 1st st, which should be rd 2. The 1st set of petals are in 3 sts, then 4, and the last set of petals are in 6 sts.
FLO [(sl st, ch 2, dc inc), (tc, p, tc), (dc inc, ch 2, sl st)] x6, [(sl st, ch2, dc inc), tc, p, tc, (dc inc, ch 2, sl st)] x 18, [(sl st, ch 2, dc), dc, tc, p, tc, dc, (dc, ch 2, sl st)] x 6. FO and weave in your ends.
Rd 12: FLO start on the right side insert your hook down by doing a [(sl st, ch 2, dc), dc 2, tc, p, tc, dc 2, (dc, ch 2, sl st)] x2, [(sl st, ch 2, dc), dc,tc, p, tc, dc (dc, ch 2, sl st)].
Wait to attach the head until after you add the dark green necklace.
Arms – (make 2)
There are more pictures in the downloadable PDF version purchasable here!
Light Green
Rd 1: sc 5 in MR
Rd 2: inc (10)
Rd 3: sc, inc (15)
Rds 4 – 7: sc around (15) (4:rounds)
Rd 8: sc, dec (10)
Rd 9: sc, dec, sc 3, dec, sc 2 (8)
Rds 10 – 20: sc around (8) (11 rounds). Stuff the hand firm and the arm loosely.
Rd 21: fold in half and sc through both layers. Sc 4 times to close (4). FO leaving a tail for sewing. Sew a seam between rds 15 and 16, to create an elbow. Attach on either side of the body equally apart, between rds 11 and 12.
Body –
Light green
Rd 1: sc 6 in MR
Rd 2: inc (12)
Rd 3: sc, inc (18)
Rd 4: sc 2, inc (24)
Rds 5 – 6: sc around (24) (2 rounds)
Rd 7: BLO sc around (24)
Rds 8 – 9: sc around (24) (2 rounds)
Rd 10: sc 2, dec (18)
Rd 11: sc around (18)
Rd 12: sc, this is where you will add the 1st arm. Insert your hook through the 1st st of the arm and body by doing a (dec, sc) x2, dec, sc (weaving your ends in as you sc), this is where you will add the 2nd arm. Insert your hook through the 1st st of the arm and body by doing a (dec, sc) x2. (as you continue to crochet weave in your ends), dec (12)
Rd 13: sc around (12) Stuff
FO leaving a tail for sewing on the head.
Foot – (make 2)
There are more pictures in the downloadable PDF version purchasable here!
Light green
Ch 6
Rd 1: sc in the 2nd ch from the hook, sc 3, 4 sc in the last ch, and continue working around the ch, sc 3. 3 sc in the 1st st you sc in. (14)
Rd 2: inc, sc 3, inc x4, sc 3, inc x3 (22)
Rds 3 – 5: sc, around (22) (3 rounds)
Rd 6: sc 3, dec 8, sc 3 (14)
Rd 7: sc 3, dec 4, sc 3 (10)
Rds 8 – 21: sc around (10) (14 rounds)
Stuff the foot firmly and the leg loosely.
Rd 22: fold in half and sc through both layers 4 times to close. (4)
FO, leaving a tail for sewing. Sew a seam between rds 14 and 15 to create a knee. Attach the feet, by lining them up, starting in the middle hole at the bottom, going out on either side of the body.
Necklace –
There are more pictures in the downloadable PDF version purchasable here!
Dark Green
In the FLO of rd 13 of the body (sl st, ch 5, sl st in the 2nd ch from the hook, sc 3 in the last 3 ch, sl st in the next FLO) x6. FO, and sew in the end. Now you can sew the head onto the BLO and weave in the ends.
Leaf Skirt –
There are more pictures in the downloadable PDF version purchasable here!
Dark Green
Ch 12 (this is a strand to be tied later), and centered at the back of the body, (sl st going up through the FLO of rd 7 of the body, {leaf starts here} ch, fdc 2, ftc 3, fdc, fhdc, {hdc p, hdc 2} in the last ch space, continue back up the underside of the foundation sts and dc, tc 3, dc2, ch, sl st in the ch where the fsc started, sl st in the FLO, sl st) x8 leaves, ch 13, FO and trim. Tie the 2 ch strands together.
I would love to see your pictures! Please tag me in your pictures,
@crochetwizzard #crochetwizzard #rosebuddy #gardenbuddies #crochetrose!
If you have any questions, please feel free to contact me! You can direct message me on Facebook or Instagram at @crochetwizzard or email me at crochetwizzardd@gmail.com.