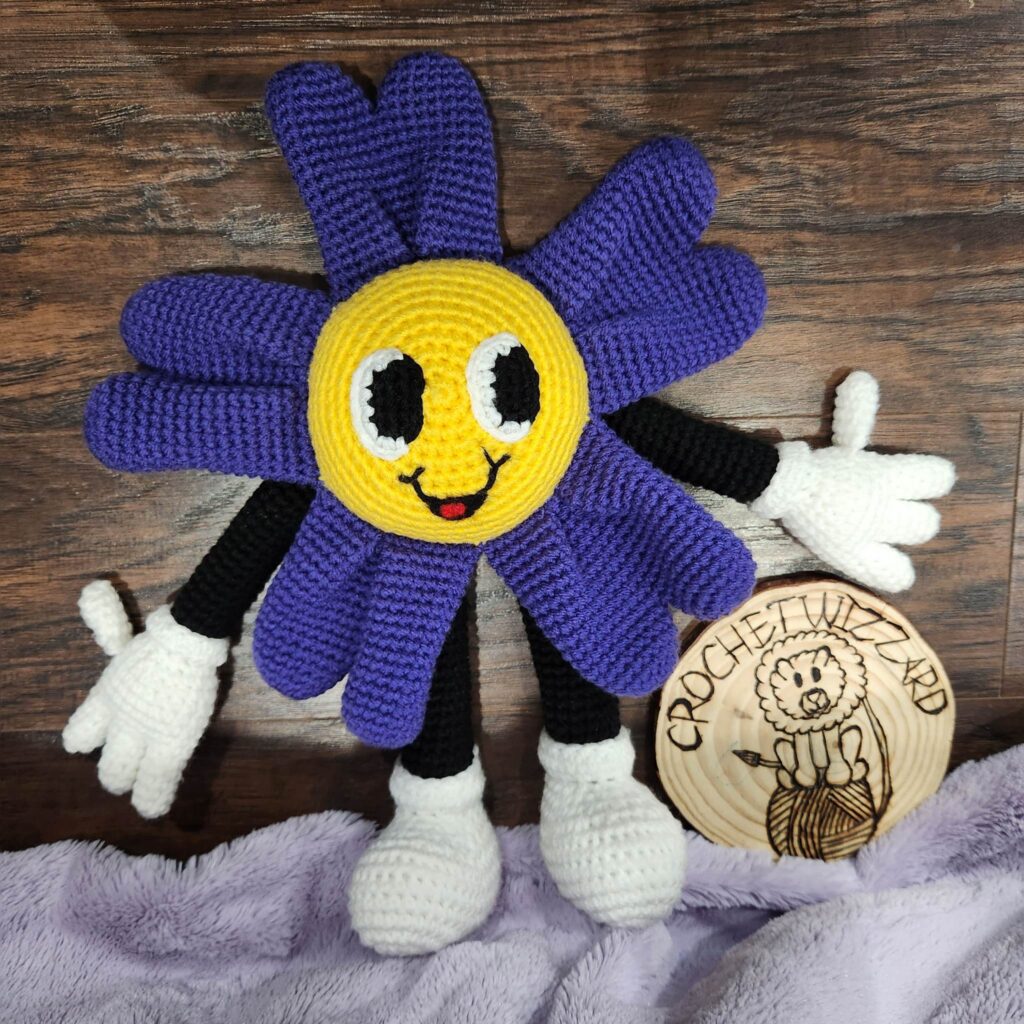
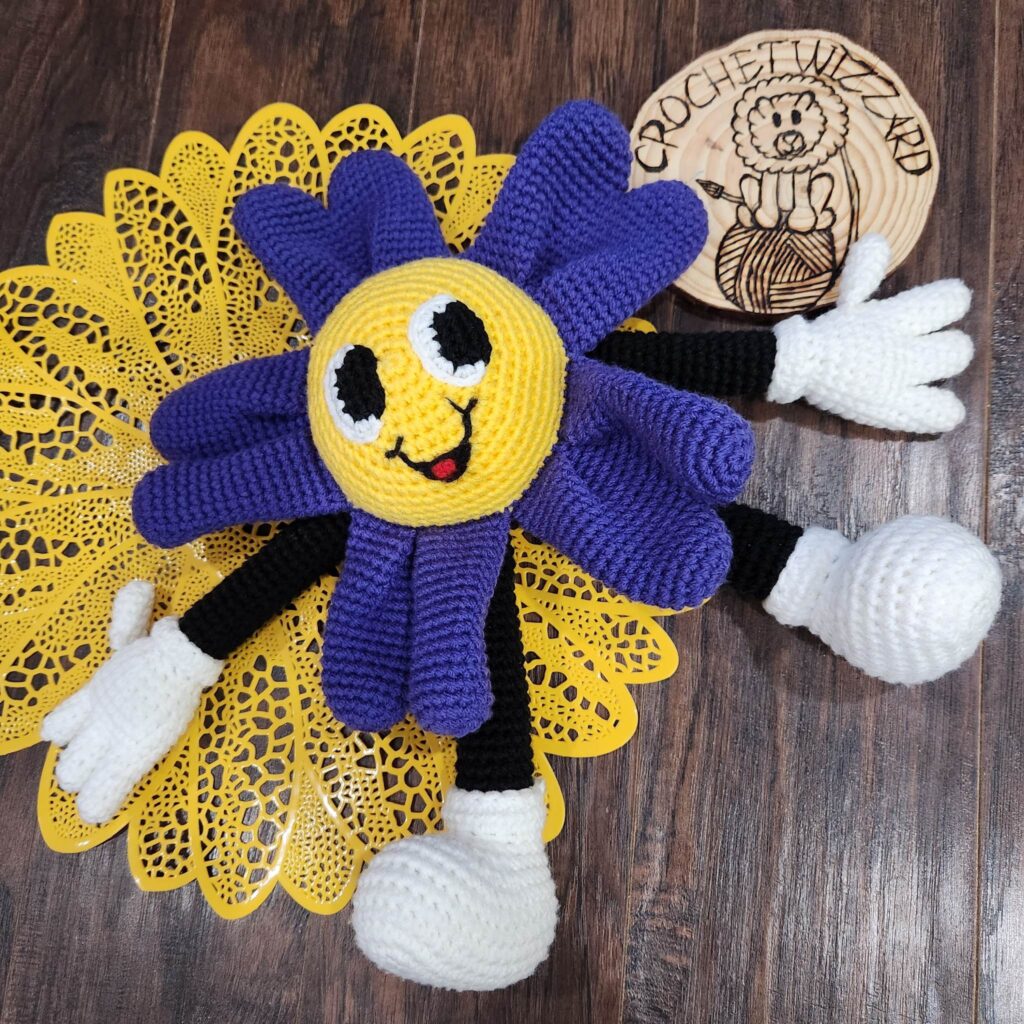
This little cutie is such a bright friend to have around! She always has a smile on her face and loves to soak up as much sun as she can! She is such a fun and bright amigurumi. She loves to dance through the grass and flowers! It helps that she is a beautiful flower that will never die! I love that about her!
She is the perfect size for a nice hug!! And yes she is hug tested and approved by my boys! And yes she is even cuter when she is being cuddled by a toddler! She is so bright and happy and with her moveable limbs, she makes for the perfect crochet toy for your little ones!
This beautiful little crochet flower is a gem to crochet. You make all of the different pieces first and then as you crochet you attach all of the different pieces other than the face! That means there’s no sewing of all of the petals, arms, and legs! It does make for some interesting crocheting after you have finished attaching the limbs! Haha! It’s quite funny! And then you are done! I love that about no sew patterns! You finish crocheting your amigurumi and you have it finished! Perfection!! I certainly hate sewing and work hard to not have to do so!


Do not sell, reproduce or change the pattern itself in any way! You are welcome to sell your completed products, just make sure to refer to me as the designer! Please make sure to tag me.
@crochetwizzard #crochetwizzard
Materials-
- Worsted weight yarn
- Purple (petal color), yellow, black, white, and red
- Hook size 3.5mm (E)
- Stitch Marker
- Polyfill
- Tapestry Needle
- Scissors
- Sewing Pins
US Terminology-
Abbreviations-
- Rd(s) – Round(s)
- MR – Magic Ring
- St(s) – Stitch(s)
- Sst – Same Stitch
- The sts in the () are done in the same stitch
- Spst – Separate Stitches
- The sts in the () are done in separate sts
- Sc – Single Crochet
- Inc – Increase
- Dec – Invisible Decrease
- In front loops only, pick up the next two loops, yarn over, and pull through 2 loops.
- FO – Fasten Off
- FLO – Front Loop Only – for closing up holes
Notes-
- Magic Ring Alternative – Chain 2 and single crochet in the second chain from the hook.
- This will be crocheted in the round.
- If not specified or in (), repeat to the end of the round.
- Stuff as you go.
Petals (make 5)-
Make 2 Petal Tips-
Petal Color
There are more pictures in the downloadable PDF version purchasable here!
Rd 1: sc 6 in MR
Rd 2: inc (12)
Rd 3: sc, inc (18)
Rd 4-6: sc around (18) (3 rounds)
With the first piece FO, with the second piece prepare to connect the two pieces.
Line up the two pieces.
Rd 7: sc around piece 1, sc around piece 2 (36)
Rd 8-18: sc around (11 rounds) DON’T STUFF.
Rd 19: sc 8, gather together the edge of the petal on the back side, sc 13 across to close.
FO, leaving a short tail.
There are more pictures in the downloadable PDF version purchasable here!
Hand (make 2)-
White
Thumbs-
Rd 1: sc 7 in MR
Rd 2-6: sc around (7) (5 rounds)
Row 7: fold in half and sc through both, sc 3 times
Stuff loosely, and FO, leaving a short tail.
Fingers (make 3 for each hand)-
Rd 1: sc 7 in MR
Rd 2-6: sc around (7) (5 rounds)
FO for the first two fingers, on the third you will now continue onto rd 7.
Rd 7: line up the fingers and sc 3 on second finger, sc 7 around the third, sc 4 on the second, sc 7 around the first (21)
Rd 8-10: sc around (21) (3 rounds)
Attach Right Thumb-
Rd 11: sc 6, this is where you will add the thumb, insert your hook through the 1st st of the thumb and next available st on the hand doing (sc 3), sc 12 (weaving your ends in as you sc) Continue onto rd 12.
Attach Left Thumb-
Rd 11: sc 16, this is where you will add the thumb, insert your hook through the 1st st of the thumb and the next available st on the hand doing (sc 3), sc 2 (weaving your ends in as you sc) Continue onto rd 12.
Rd 12: sc around (21)
Rd 13: sc 5, dec (18)
Rd 14: sc, dec (12) Stuff
Change to Black but don’t FO White.
Rd 15: BLO sc around (12)
Rd 16-33: sc around (12) (18 rounds) Stuff loosely.
Row 34: sc 2, fold in half and sc through both, sc 6 times
FO, leaving a short tail.
Continuing with the White on the FLO of Rd 12
Rd 13: FLO inc (24)
Rd 14: sc around (24)
Rd 15: dec (12)
FO, and weave in ends.
Feet (make 2)-
White
Ch 11
Rd 1: sc in the second ch from the hook, sc 8, 4 sc in the last ch, and continue working around the ch, sc 8, 3 sc in the last st (24)
Rd 2: inc, sc 8, inc x4, sc 8, inc x3 (32)
Rd 3: sc, inc, sc 8, inc, sc, inc, sc 2, inc, sc , inc, sc 8, inc, sc, inc, sc 2, inc (40)
Rd 4-8: sc around (40) (5 rounds)
Rd 9: sc 6, (dec, sc)spst x4, (sc, dec)spst x4, sc 10 (32)
Rd 10: sc 6, dec 8, sc 10 (24)
Rd 11: sc 4, dec 6, sc 8 (18)
Rd 12: sc 4m dec 3, sc 8 (15) Stuff
Change to Black, but don’t FO White
Rd 13: BLO sc around (15)
Rd 14-35: sc around (15) (22 rounds) Stuff loosely
Row 36: sc 5, fold in half and sc through both, sc 7 times
FO, leaving a short tail.
Continuing with the White on the FLO of Rd 12
Rd 13: FLO inc (30)
Rd 14: sc around (30)
Rd 15: dec (15)
FO, and weave in ends.
Eyes (Make 2)-
Black
Ch 5
Rd 1: sc in the 2nd ch from hook, sc 2, sc 3 in the last ch, continue around the ch and sc 2, inc (10)
Rd 2: inc, sc 2, inc, Change to White, inc 2, sc 2, inc 2 (12)
FO, leaving a tail for sewing of white and black.
Face-
Yellow
There are more pictures in the downloadable PDF version purchasable here!
Rd 1: sc 6 in MR
Rd 2: inc (12)
Rd 3: sc, inc (18)
Rd 4: sc 2, inc (24)
Rd 5: sc 3, inc (30)
Rd 6: sc 4, inc (36)
Rd 7: sc 5, inc (42)
Rd 8: sc 6, inc (48)
Rd 9: sc 7, inc (54)
Rd 10: sc 8, inc (60)
Rd 11-13: sc around (60) (3 rounds)
There are more pictures in the downloadable PDF version purchasable here!
While working rd 14, you will be adding all 5 of the petals by placing the folded side of the petal against the right side of the face. The petals overlap by 1 st. You will insert your hook through the petal you are finishing, then through the new petal, and then the yellow face, YO and pull through all 3 and finish the sc like normal. Do the same thing, but only through one petal for the sts of the petal, all the way around.
Rd 14: sc around (60)
There are more pictures in the downloadable PDF version purchasable here!
Rd 15 is where you will add all 4 limbs by laying right and front sides together, by going through the limb and then yellow face and completing the sc.
Rd 15: sc 9, right hand (sc 6)spst, sc 2, 1st leg (sc 7)spst, sc, 2nd leg (sc 7)spst, sc 2, left hand (sc 6)spst, sc 20 (40)
There are more pictures in the downloadable PDF version purchasable here!
Rd 16-17: sc around (40) (2 rounds)
Rd 18: sc 8, dec (54)
Rd 19: sc 7, dec (48)
Rd 20: sc 6, dec (42)
Rd 21: sc 5, dec (36)
Rd 22: sc 4, dec (30)
Rd 23: sc 3, dec (24)
Rd 24: sc 2, dec (18)
Rd 25: sc, dec (12) Stuff
Rd 26: dec (6)
FO, and weave in ends.
Sew on the eyes centered on the face and add a mouth centered between eyes and below them.
There are more pictures in the downloadable PDF version purchasable here!
I would love to see your pictures! Please tag me in your pictures,
@crochetwizzard #crochetwizzard #dancingdaisy #crochetdaisy #crochetflower!
If you have any questions, please feel free to contact me! You can direct message me on Facebook or Instagram at @crochetwizzard or email me at amidesigns@crochetwizzard.com