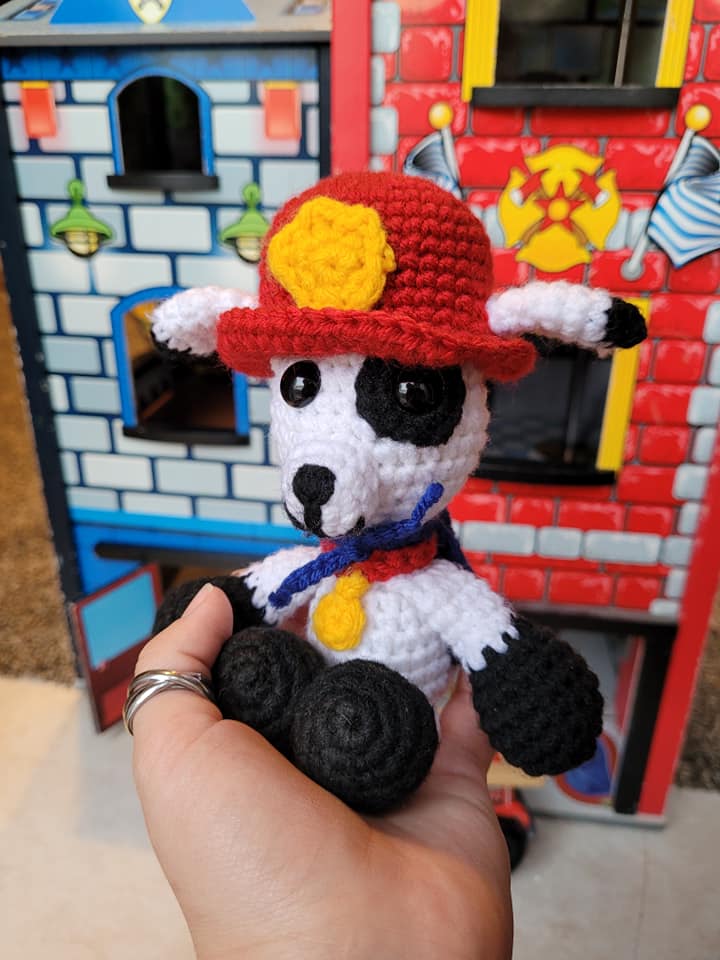
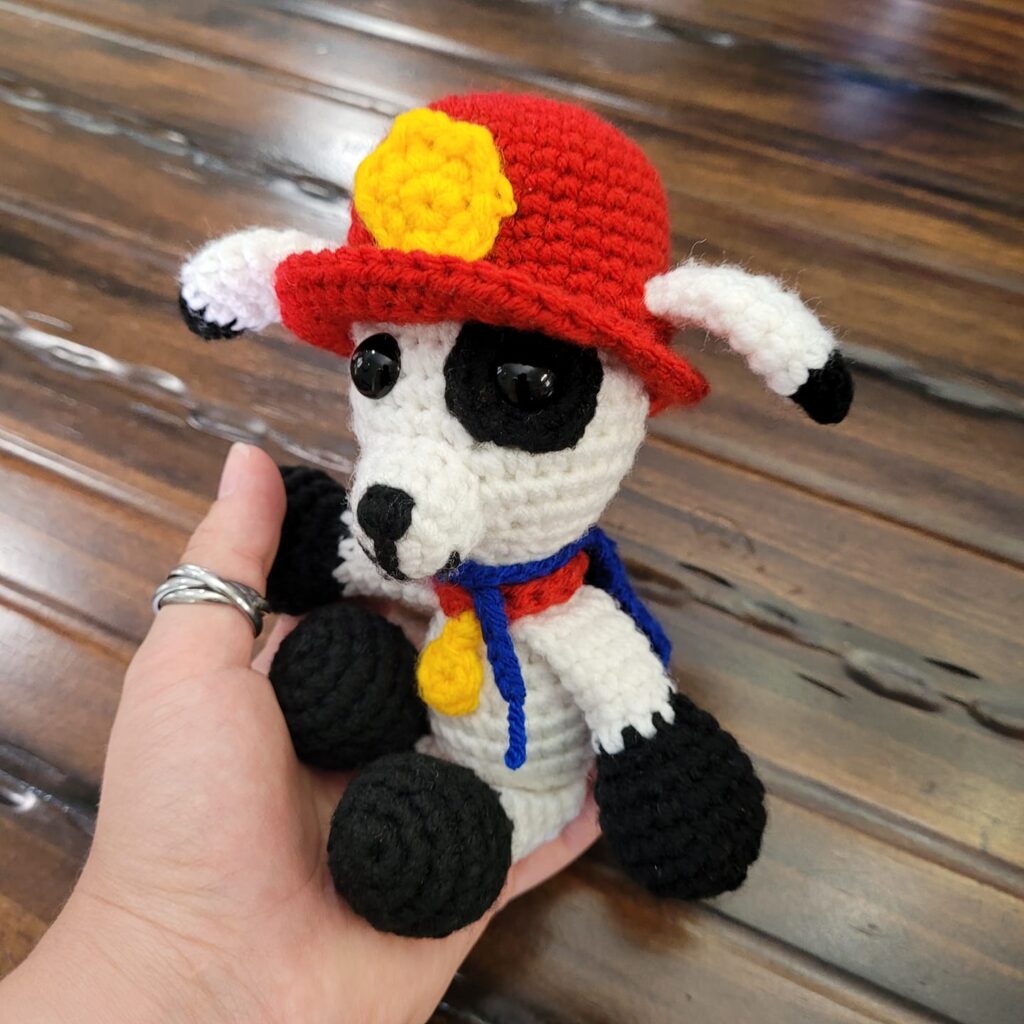
He’s a puppy, so he’s still in training! Don’t underestimate him! Sparky is already an important part of the fire force! He is their eyes, ears, and nose on the ground!! He is smart, strong, and eager to learn!


Do not sell, reproduce or change the pattern itself in any way! You are welcome to sell your completed products, just make sure to refer to me as the designer! Please make sure to tag me.
@crochetwizzard #crochetwizzard!
Materials-
- Worsted weight yarn
- White, red, blue, yellow, and black
- Hook size 3.5mm (E)
- 12mm Safety Eyes or an alternative form of eyes
- Stitch Marker
- PolyFill
- Tapestry Needle
- Scissors
- Sewing Pins
US Terminology
Abbreviations-
- Rd(s) – Round(s)
- MR – Magic Ring
- St(s) – Stitch(es)
- Ch – Chain
- Sk – Skip
- Fd – Foundation Chain
- Ch 2, insert hook into the 2nd ch from the hook, yarn over, pull loop through 1 loop, make sure the loop is loose, yarn over, and pull through 2 loops. That is the equivalent of a 1 ch and 1 sc, Repeat to the desired 1 row length.
- Sc – Single Crochet
- Hdc – Half Double Crochet
- DC – Double Crochet
- Inc – Increasse
- Hdc Inc – Half Double Crochet Increase
- Dc Inc – Double Crochet Increase
- Dec – Invisible Decrease
- In front loops only, pick up the next 2 loops, yarn over, and pull through both loops on your hook.
- FO – Fasten Off
- FLO – Front Loop Only – for closing up the holes.
Notes-
- Magic Ring Alternative – chain 2 and single crochet in the 2nd chain from the hook.
- This will be crocheted in the round.
- If not specified or in (), repeat to the end of the round.
- Stuff as you go.
Ears (make 2)-
Black
Rd 1: sc 4 in MR
Rd 2: inc (8)
Switch to white
Rd 3: sc, inc (12)
Rds 4-6: sc around (12) (3 rounds)
Rd 7: sc, dec (8)
Rds 8-9: sc around (8) (2 rounds)
Rd 10: fold and sc through both sides. Sc 4 times to close.
FO and you will weave in your ends later.
Limbs (make 4)-
There are more pictures in the downloadable PDF version purchasable here!
Black
Rd 1: sc 6 in MR
Rd 2: inc (12)
Rd 3: sc, inc (18)
Rds 4-6: sc around (18) (3 rounds)
Rd 7: sc, dec (12)
Rd 8: sc, dec (8)
Switch to white
Rds 9-13: sc around (8) (5 rounds) Stuff the paw well and the limb loosely.
Rd 14: fold and sc through both sides. Sc 4 times to close.
FO, you will weave in your ends later.
Patch – (make 2 or how many you’d like)
There are more pictures in the downloadable PDF version purchasable here!
Black-
Rd 1: sc 6 in MR
Rd 2: inc (12)
FO, leaving a tail for sewing.
Tail-
There are more pictures in the downloadable PDF version purchasable here!
Black-
Rd 1: sc 6 in MR
Rd 2: sc around (6)
Switch to white
Rds 3-5: sc around (6) (3 rounds)
Rd 6: fold and sc through both sides. Sc 4 times to close.
FO, you will weave in your ends later.
Head-
There are more pictures in the downloadable PDF version purchasable here!
White-
Rd 1: sc 6 in MR
Rd 2: inc (12)
Rd 3: sc, inc (18)
Rd 4: sc 2, inc (24)
Rd 5: sc 3, inc (30)
Rd 6: sc 2, this is where you will add the ear. Insert your hook through the 1st st of the ear, then through the next st of the head and finish the sc x4, sc 11, (weaving your ends in as you sc), this is where you will add the next ear, insert your hook through the 1st st of the ear, then through the next st of the head and finish the sc x4, sc 9 (weaving your ends in as you sc)(30)
Rds 7-10: sc around (30) (4 rounds)
Rd 11: sc 3, dec (24) Insert 1 eye through one of the patches. Insert your eyes between rds 6 and 7, 5 sts apart. Using the tail left on the patch, sew the patch down.
Rd 12: sc 2, dec (18)
Rd 13: sc, dec (12)
Rd 14: sc 2, dec (8)
Rd 15: sc around (8)
Rd 16: sc 2, inc (12) Stuff
Rd 17: this is where you will add the arm. Insert your hook through the 1st st of the arm and then through the next st of the body. Finish the sc x4, sc 2 (weaving your ends in as you sc), this is where you will add the next arm. Insert your hook through the 1st st of the arm and then through the next st of the body. Finish the sc x4, sc 2 (weaving your ends in as you sc) (12)
Rd 18: sc, inc (18)
Rd 19: sc around (18)
Rd 20: sc 2, inc (24)
Rds 21-23: sc around (24) (3 rounds)
Rd 24: (sc 2, dec) x5, sc, this is where you will add the tail. Insert your hook through the 1st st of the tail and then through the next st of the body, finish the sc x3 (for the dec insert your hook through the tail and continue with the dec like normal. The last st of the tail will continue onto the next rd (18)
Rd 25: sc, dec (12) Stuff, make sure you stuff the neck extra firm, to help prevent a wobbly head.
Rd 26: dec (6)
FO and weave in your ends. Attach the legs, starting on either side of the “rd” closing up the body, going out the sides. Attach the spot on the back, down and to the left close to the tail. Or where it looks good to you.
Muzzle-
There are more pictures in the downloadable PDF version purchasable here!
White-
Rd 1: sc 6 in MR
Rd 2: inc (12)
Rds 3-4: sc around (12) (2 rounds)
FO, leaving a tail for sewing. Sew the top below rd 8 and the bottom above rd 13. Stuff as you are sewing. Add the nose and mouth to the muzzle with the nose starting above rd 2 down to below rd 2. The mouth will go down under the other side of rd 1.
Collar-
Red-
Fd 16 (adjust according to how big the neck is after stuffing)
FO, leaving a tail for sewing.
Yellow
Sc 6 in MR
FO, leaving a tail to tack the yellow part down, if desired. Now put the collar around the neck and tack it down.
Hat-
Red-
Rd 1: sc 6 in MR
Rd 2: inc (12)
Rd 3: sc, inc (18)
Rd 4: sc 2, inc (24)
Rd 5: sc 3, inc (30)
Rd 6: sc 4, inc (36)
Rds 7-11: sc around (36) (5 rounds)
Rd 12: sc 5, ch 5, sk 5 sc, sc 13, ch 5 and sk 5 sc, sc 8 (26 sc, 10 ch)
Rd 13: sc around (36)
Rd 14: FLO dc 3, sc 2, inc, (sc 5, inc) x4, dc 5, dc inc (42)
Rd 15: dc 3, inc, sc 6, inc, sc 2, dc 4, dc inc, dc 6, inc, sc 6, inc, sc 3, dc 3, dc inc, dc 3 (48)
Rd 16: dc 3, sc 4, inc, sc 7, hdc inc, hdc 7, hdc inc, hdc 3, sc 4, inc, sc 7, inc, dc 7, dc inc (54)
Rd 17: dc 3 to make the dc look more even. FO, and weave in the ends.
When you put the hat on, put the ears through the holes on either side and add stuffing, to help prevent caving, after placing your hat on Sparky.
Hat’s Shield-
Yellow-
Rd 1: sc 6 in MR
Rd 2: {(sc, ch 1, dc, ch1) in same st} x3, inc, (sc, ch 1, dc, ch 1) in same st, inc (12)
FO, leaving a tail for sewing. Sew to the front of the hat.
Cape-
Blue-
Ch 13
Row 1: sc in the 2nd ch from the hook, sc across, ch 1 and turn (12)
Rows 2-3: sc across, ch 1 and turn (12) (2 rows)
Row 4: sc 5, dec, sc 5, ch 1 and turn (11)
Row 5: sc across, ch 2 and turn (11)
Row 6: sc 4, dec, sc 5, ch 1 and turn (10)
Row 7: sc across, ch 1 and turn (10)
Row 8: sc 4, dec, sc 4, ch 1 and turn (9)
Row 9: sc across, ch 1 and turn (9)
Row 10: sc 4, dec, sc 3, ch 1 and turn (8)
Row 11: sc across, ch 1 and turn (8)
Row 12: sc 3, dec, sc 3 (7)
Straps: ch 13, FO. Attach yarn to row 12 on the other side, ch 13, FO. (You can make the straps longer if desired) Tie around the neck.
I would love to see your pictures! Please tag me in your pictures.
@crochetwizzard #crochetwizzard! #sparkythefiredog
If you have any questions, please feel free to contact me! You can direct message me on Facebook or Instagram at @crochetwizzard or email me at crochetwizzardd@gmail.com.